


A Midsummer Dahlia Q&A
It’s that time of year when we begin to stress a little over our dahlias. But there’s really no need— midsummer dahlias issues are normal when you grow in a hot humid climate that is less than desirable for dahlias. We all experience issues at one time or another during the season. I’m sharing some questions that I have received recently and answering them for you here b/c I promise you— You aren’t the only one!!
Question: I have grown dahlias for years. This year, several have been hit by powdery mildew. I have sprayed and sprayed a commercial organic neem oil and removed impacted leaves - it just keeps moving through the plants.
Answer: Neem is often proclaimed as the answer to a lot of things while gardening and it can be very helpful. But it’s not the only tool in the box. Neem is a great first go to but it can only combat so much. For powdery mildew issues, Copper fungicide is a great next step when neem won’t cut it. Also Cease and Milstop are great options too.


Question: Ugh! What’s wrong!? My dahlia blooms are deformed or not opening much before they die. Plus their color is not as brilliant as last year. Help…
Answer: Two parter here— Deformity in blooms is usually a thrip issue. When one side of the flower opens but not the other- usually means you have some thrip problems. Spraying with Capt’n Jacks Dead Bug Brew (Spinosad - active ingredient) is helpful. Alternate with a spray like Bio-Ceres WP. Don’t spray the same thing week after week, always alternate your sprays.
As to the color issue: High heat and longer daylight hours cause dahlias to change color. Don’t worry, they’ll fix themselves this fall. Just enjoy the rainbow color changing show!


Question: My 12 dahlias are in 7 gallon grow bags planted on May 5. They are no where near budding. Am I over fertilizing, too hot? When should I expect flowers?
Answer: Dahlias usually begin blooming in late summer. The earliest varieties take at least 65-70 days and some take up to 120. The heat will slow them down. From a May planting, usually you’ll see dahlias in early August. But Fall is their primetime, so hang in there— the show hasn’t begun yet!


Question: Have you seen spider mites yet?
Answer: I wish I could say no, but they have been pretty bad this year actually. The high heat and dryness we have had during several parts of the season so far have brought on lots of spider mites. I tried Conserve (the commercial version of Capt’n Jacks) and it did help but I had to pull out the big guns eventually and go with Avid. Our recent cut back (early July) is helping b/c we are removing a lot of the infested material. So we’ll be on a pretty strict spray regimen for at least the next 2 months until it cools and we get some more moisture.


Mid summer is hard but keep on keeping on— just make sure you are feeding, taking care of bugs and watering. You’re hard work will pay off!!
And if you are really stressed— Read my blog post from last summer: Your Dahlias Need a Therapist
My Midsummer Dahlia Plan
It’s the end of our Spring bloom season even though it feels like it just started. It’s time to prune our dahlias back for Autumn. If you are new to dahlia growing, you may not be familiar with the idea and for years, neither was I!
First thing we need to do is determine if pruning is right for you. If you live in a climate where you have to dig your dahlias due to freezing soil temperatures in winter- this is not for you. Pruning dahlias mid season is for those who can overwinter tubers in the ground or who live in a climate where you are able to plant in February or maybe even can grow year round. The purpose of a midsummer prune is to give the plants a chance to rejuvenate new growth for better fall blooms and also to eliminate the load of leafy plant material during the extreme heat of mid summer.
If you live in a hot climate but didn’t plant until late April/early May, then there’s no need to do a mid summer prune. If your dahlias haven’t bloomed yet, leave them be.
The timing of the pruning can vary according to where you live. I’m a zone 7b South Carolina. I want my dahlias to begin reblooming around mid to late August. Re-bloom takes from 5-8 weeks usually depending on variety (and climate conditions). So now is a pretty ideal time for me. If you are hotter, you might want to wait a little bit to shift your bloom window a little later when your weather cools.
Here’s My Plan:
1. Remove the netting and any remaining organza bags. We will lift the netting off the beds, roll it up and place it at the end of the row. If we still have any bagged buds, off they come!
2. Inspection: We will visually inspect each row for potential virus. Those plants will be removed and burned. We will also inspect for insect damage that we need to address
3. Cut back. We will use electric hedge trimmers to take the bulk of the material off the plant and then clean up with clippers. We will be cutting back around 2500 plants so hand cutting each plant is not a feasible option. But hand trimming is just fine for your dahlia cutting garden. We will be sanitizing clippers between each variety. Since it’s not practical to do so between each plant, step #2 becomes very important. If you have a number of plants where sanitization can be done between each one, I’d recommend it. This is also a good time to get rid of any weeds that have crept in.
How much to cut back? Well this depends on how old your plant is. For our plants that we overwintered, we cut back pretty low, around 8”. For varieties that we planted early this spring, we will cut back by about half. I’ve found that you need a good strong tuber base under the plant to cut back really hard.
4. Spray. So we will spray most of our plants with Surround. This is a kaolin clay spray that will help prevent bug damage to the plants but most importantly will lower the temperature around the plants and prevent sunburn.
Some of our plants are side planted with crops that are going to flower this Autumn so we can’t use the Surround. We will spray those with organic insecticides according to what pests we noticed during our scouting in step #2.
5. Feed. We will feed the plants with a complete fertilizer (nitrogen, phosphorus, and potassium). We will go a bit higher on the nitrogen (to push green growth) this round and then future rounds will be higher phosphorus and potassium to push blooms. We will use a granular since the plants are cut back and we will have a lot of soil exposed. We will also put a light foliage fertilizer in our spray mix. The reason for this is that you’ll need rain for the granular to work in and activate. But ideally, it’s a good idea to cut back when you aren’t going to have rain for a few days b/c you are going to end up with a lot of hollow stems during this prune. So giving a foliar spray helps the plants generate new leafy growth to help cover those hollow stems. We will also mix in a fungicide on the plants that don’t get the Surround because we are going into a dry heat wave the next few weeks. Hot and dry is prime conditions for powdery mildew.
6. Re-install your netting. Go ahead and put that netting back up and set it in place. If you do it now, you won’t forget later and end up with floppy dahlias. (or if you forgot to use it earlier in the season, this is your chance to correct the mistake)
7. Water well. This is a time where you really want a drip irrigation system. If you are overhead watering, be careful not to rot your dahlias out. The plants are going to be a little stressed when you have messed with them so much but in the long run will appreciate the love you’ve given them.
It’s important to pay attention to your plants after pruning, the next 2 weeks are crucial. Watch your weather patterns- give them extra water if you are really hot. If you end up in a rainy situation, watch out for rot and fungus. If you give them your attention for this short period, you’ll reap great rewards in the fall.
The Fix- For Now At Least
So we have done some work on fixing our drowning dahlias problem. But will wait until next week to complete it. We are in the middle of a heat wave so I’m waiting until that passes to replant.
We dug the rotted dahlias out of the row this week. Didn’t have to take everything but removed about 35% of it.
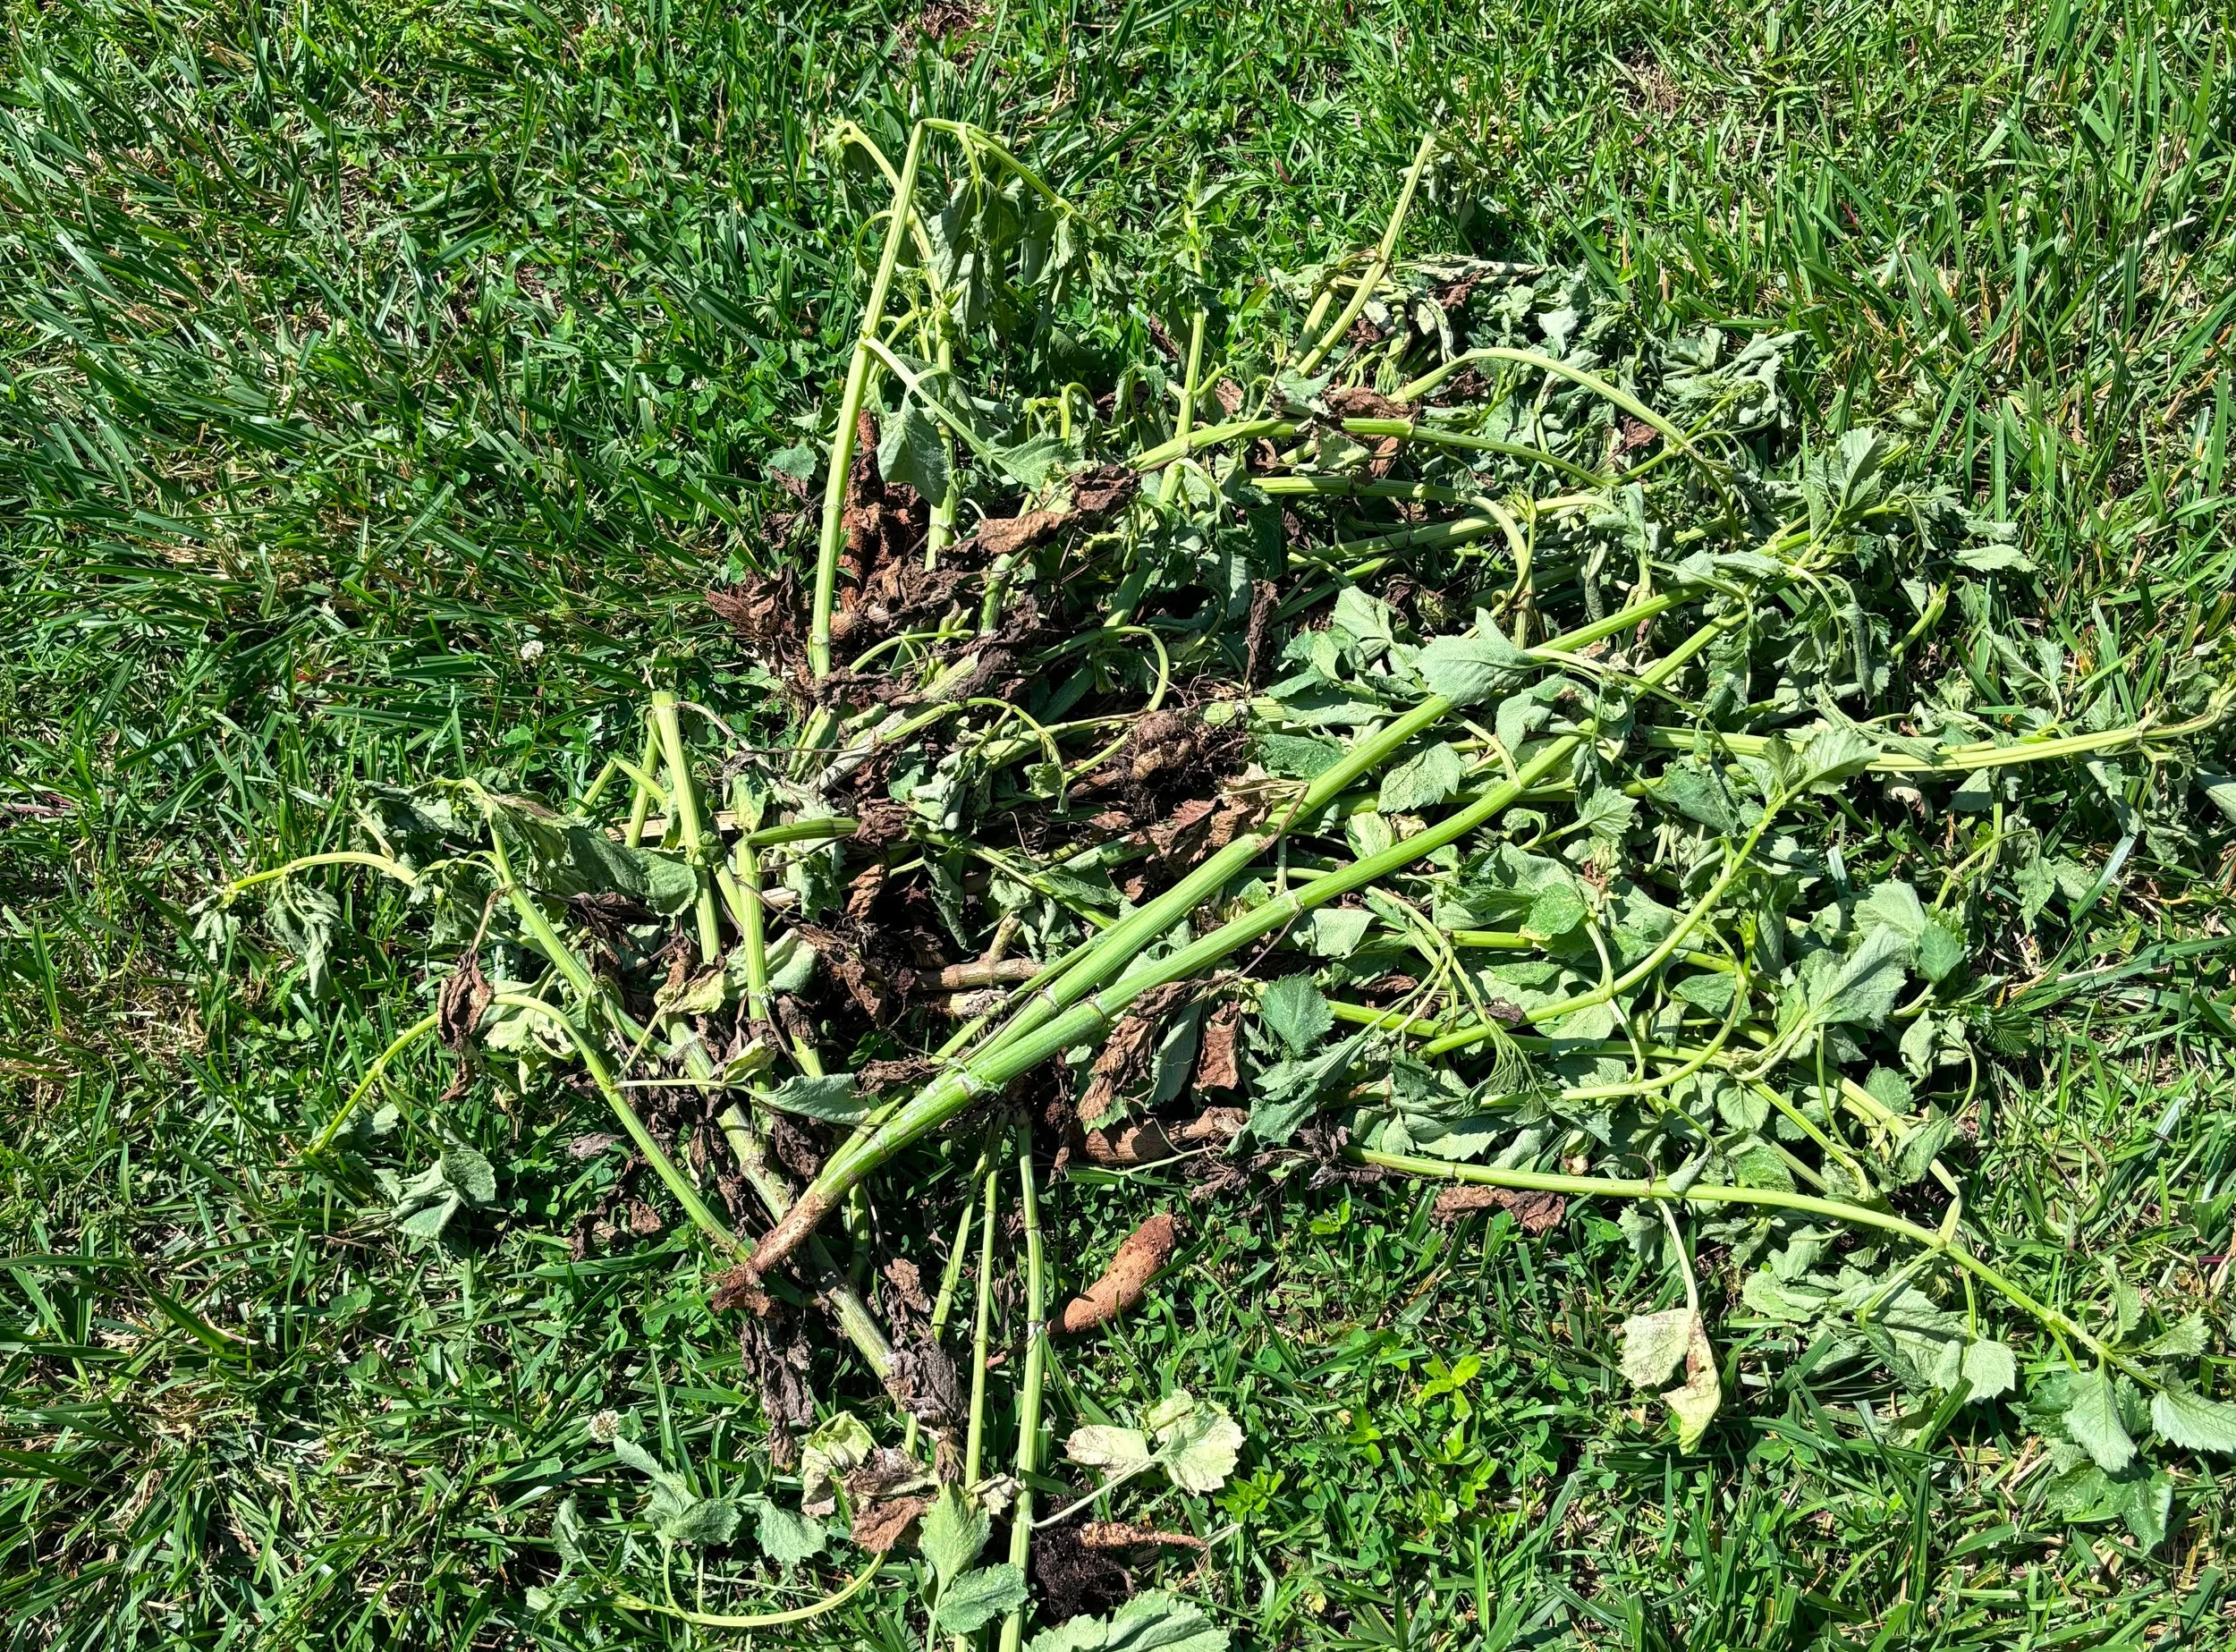
It doesn’t take long to see that there are no tuber clumps at the base of these plants. They were completely rotted. We did find a few plants that had some small tuber clumps - my guess is that these were rooted cuttings we planted really early. We will replant those once we improve the drainage. We will add compost and probably some gypsum now and then redo the whole field this fall.
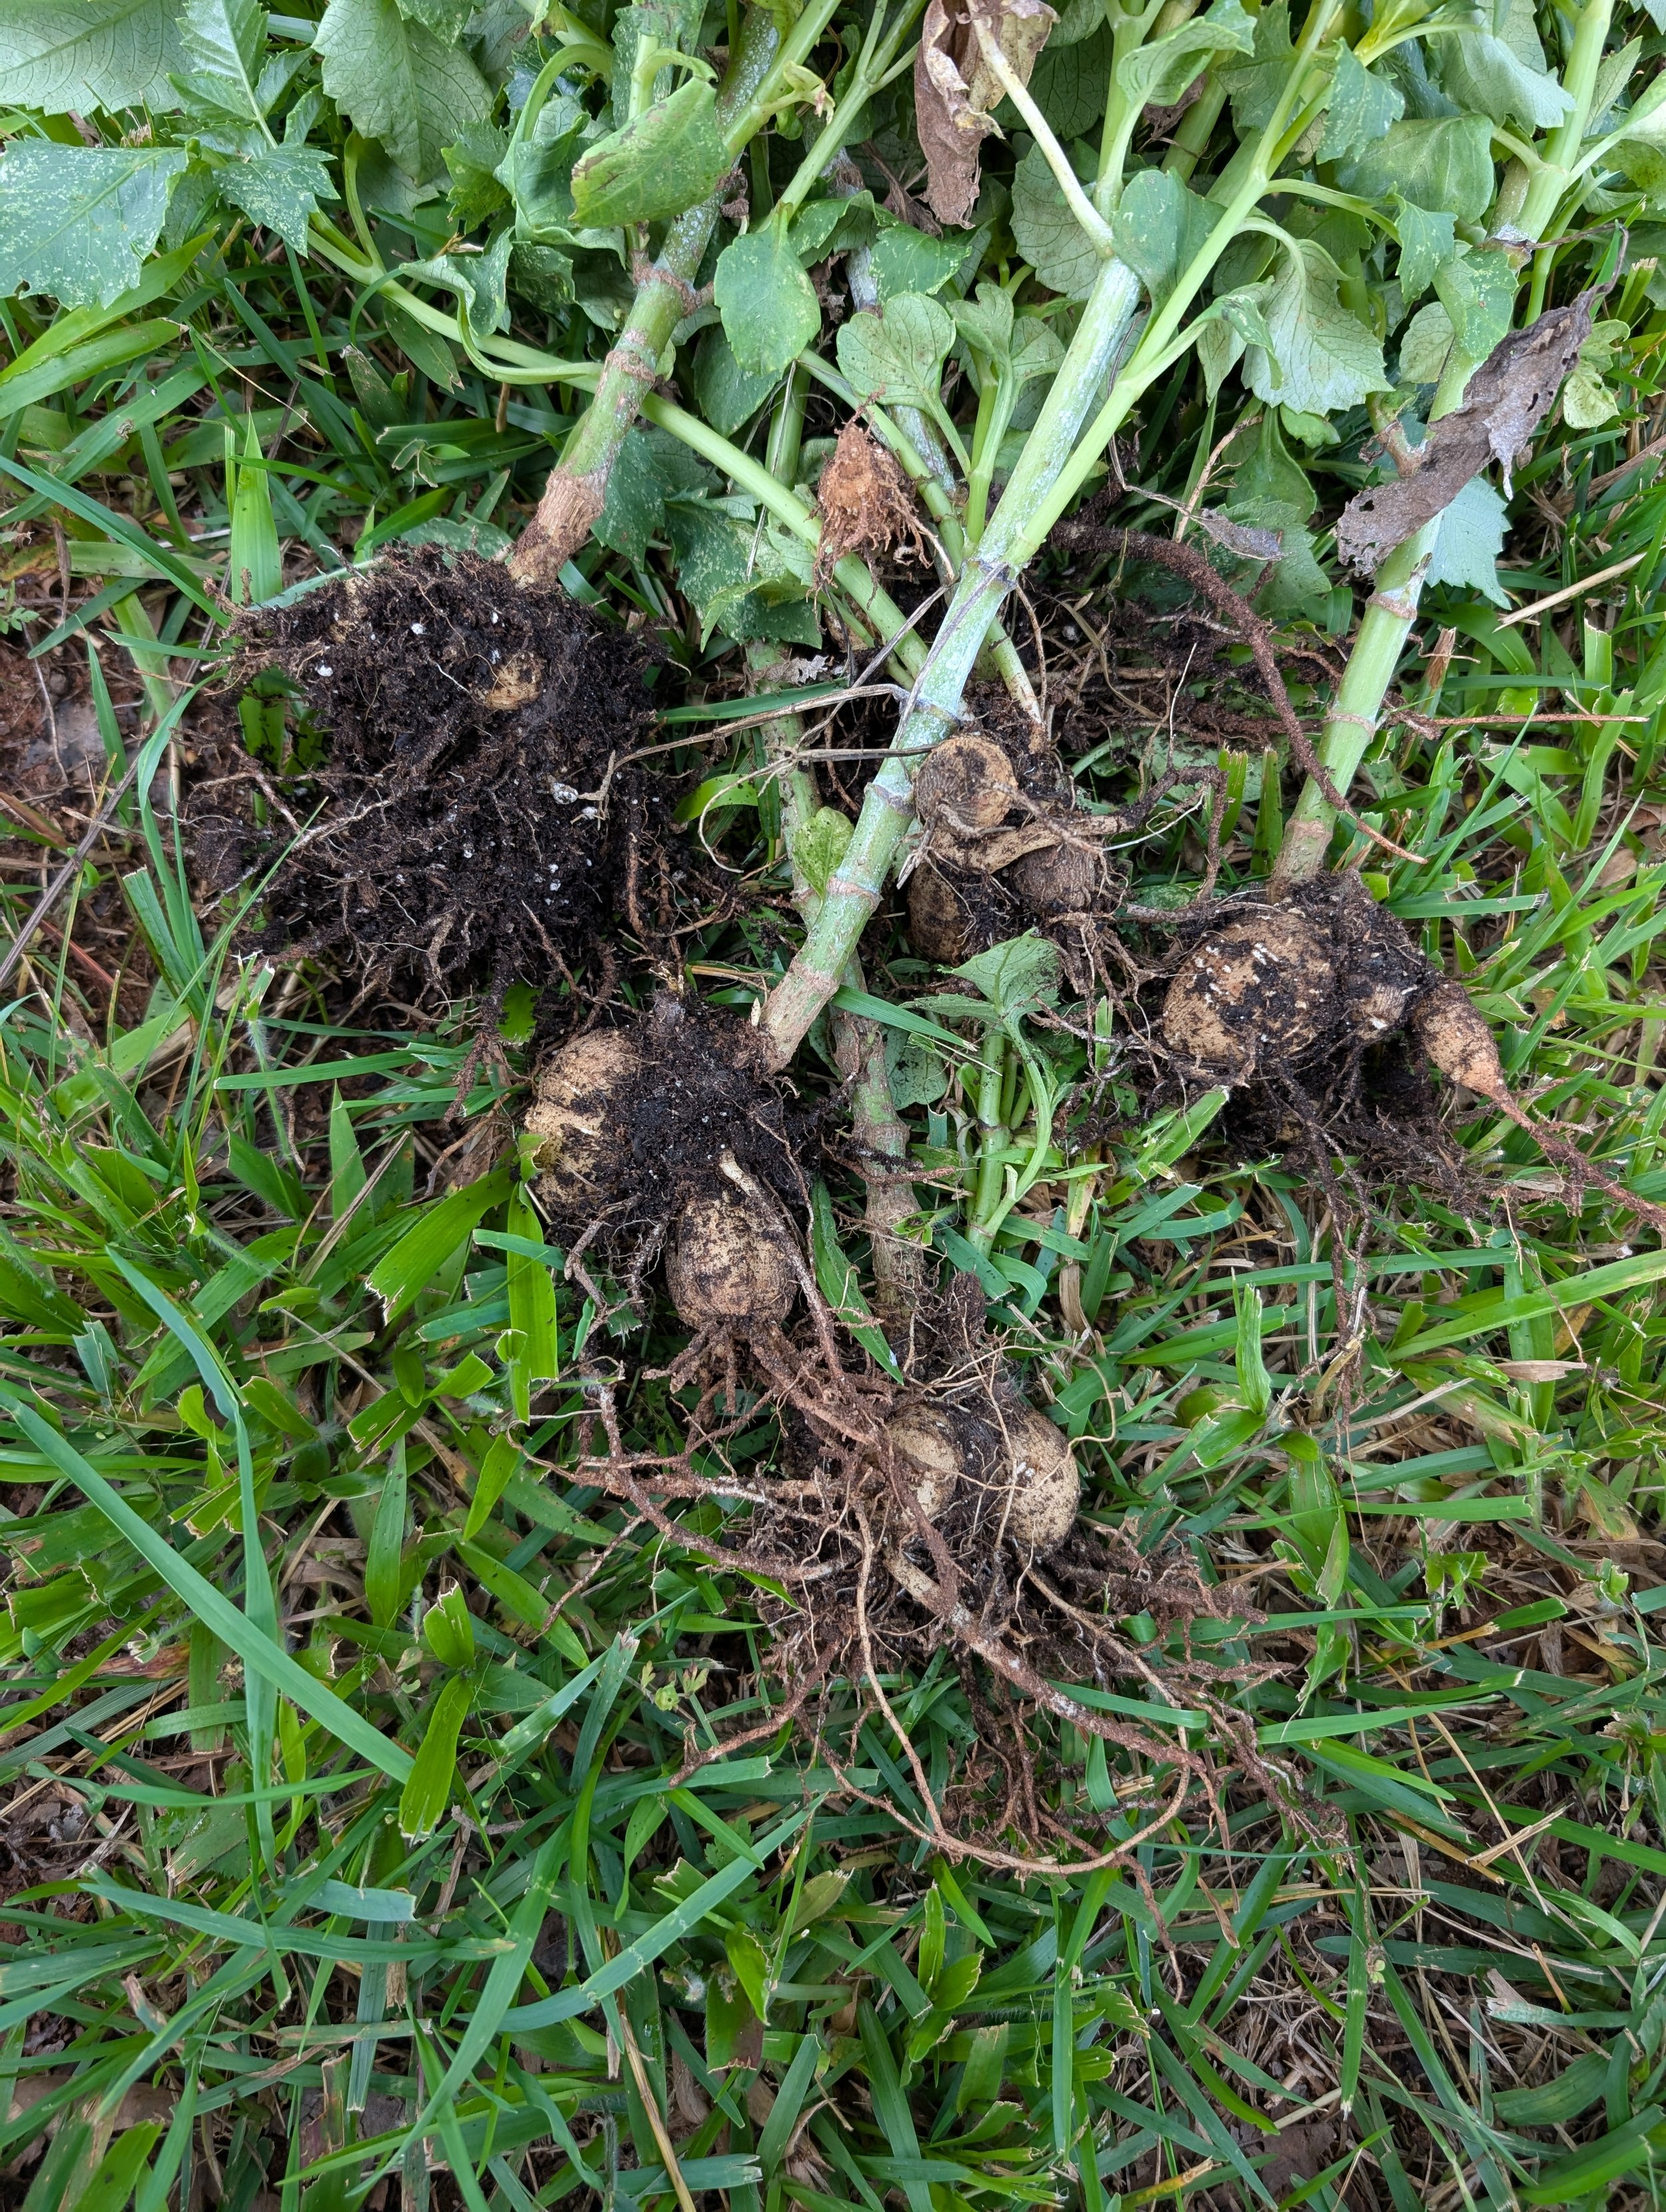
I did find we still had a few cuttings of this variety left so we’ll plant those and just fill in the rest with small clumps of Blizzard tubers. The row will still be all white, we’ll just have to label the plants carefully. It’s no fun to have to fix this mid- season but I’m thankful it’s early enough to fix it!
Time to Fix It!
Unfortunately a few rows of our dahlias haven’t rebounded from the 10+ days of rain we had recently. So it’s fix it time!! I don’t enjoy doing things like this mid season but since it’s early enough in the season, we can fix it and still get a crop for this fall.
Here’s my plan:

The situation is this: I’ve got a row of Ryecroft Jan dahlias (beautiful white ball) that are drooping and giving signs that the tubers are rotting.
We are going to cut back the plants, dig them up. We’ll go through the clumps to see if anything is salvageable. If so, we’ll replant those tubers but most likely I think we are going to have to replace. I’ve got some left over Blizzards so I’ll swap those in.
Before replanting, we will dig out the pathways on either side which will raise the bed up some and then also we will add a few inches of compost on top to raise the level of the bed.
Ideal situation in this scenario would be if I had rooted cuttings available to replant with those. The row has some rooted cuttings we planted this Spring and those plants are faring great! They have more roots available to handle the water and haven’t developed big tuber bases yet.
This pic above was taken in the middle of all the rain and shows the row at it’s worst. The dahlias in the foreground have rebounded but over half the row towards the back is still struggling. We might keep part of the row, I’ll see how things look as we dig. Wish us luck! We’ll definitely be doing some major work in here this winter but need to get a “band-aid” on it for now!
Drowning (in) Dahlias
We’ve had just about every type of weather you could imagine for this time of year! Definitely been on the roller coaster ride recently. Over the past week we’ve had at least 10 inches of rain, kinda lost count after that. We are due for some more through early next week too. Needless to say, we have not been planting tubers this week!
But we have been planting lots of cuttings. We’ve been hopping out in between storms and getting our beds prepped. Permanent raised beds are a big advantage in weather like this- we don’t have to wait for them to dry enough to till. So we’ve just ripped out the previous crop, amended if needed and then replanted!
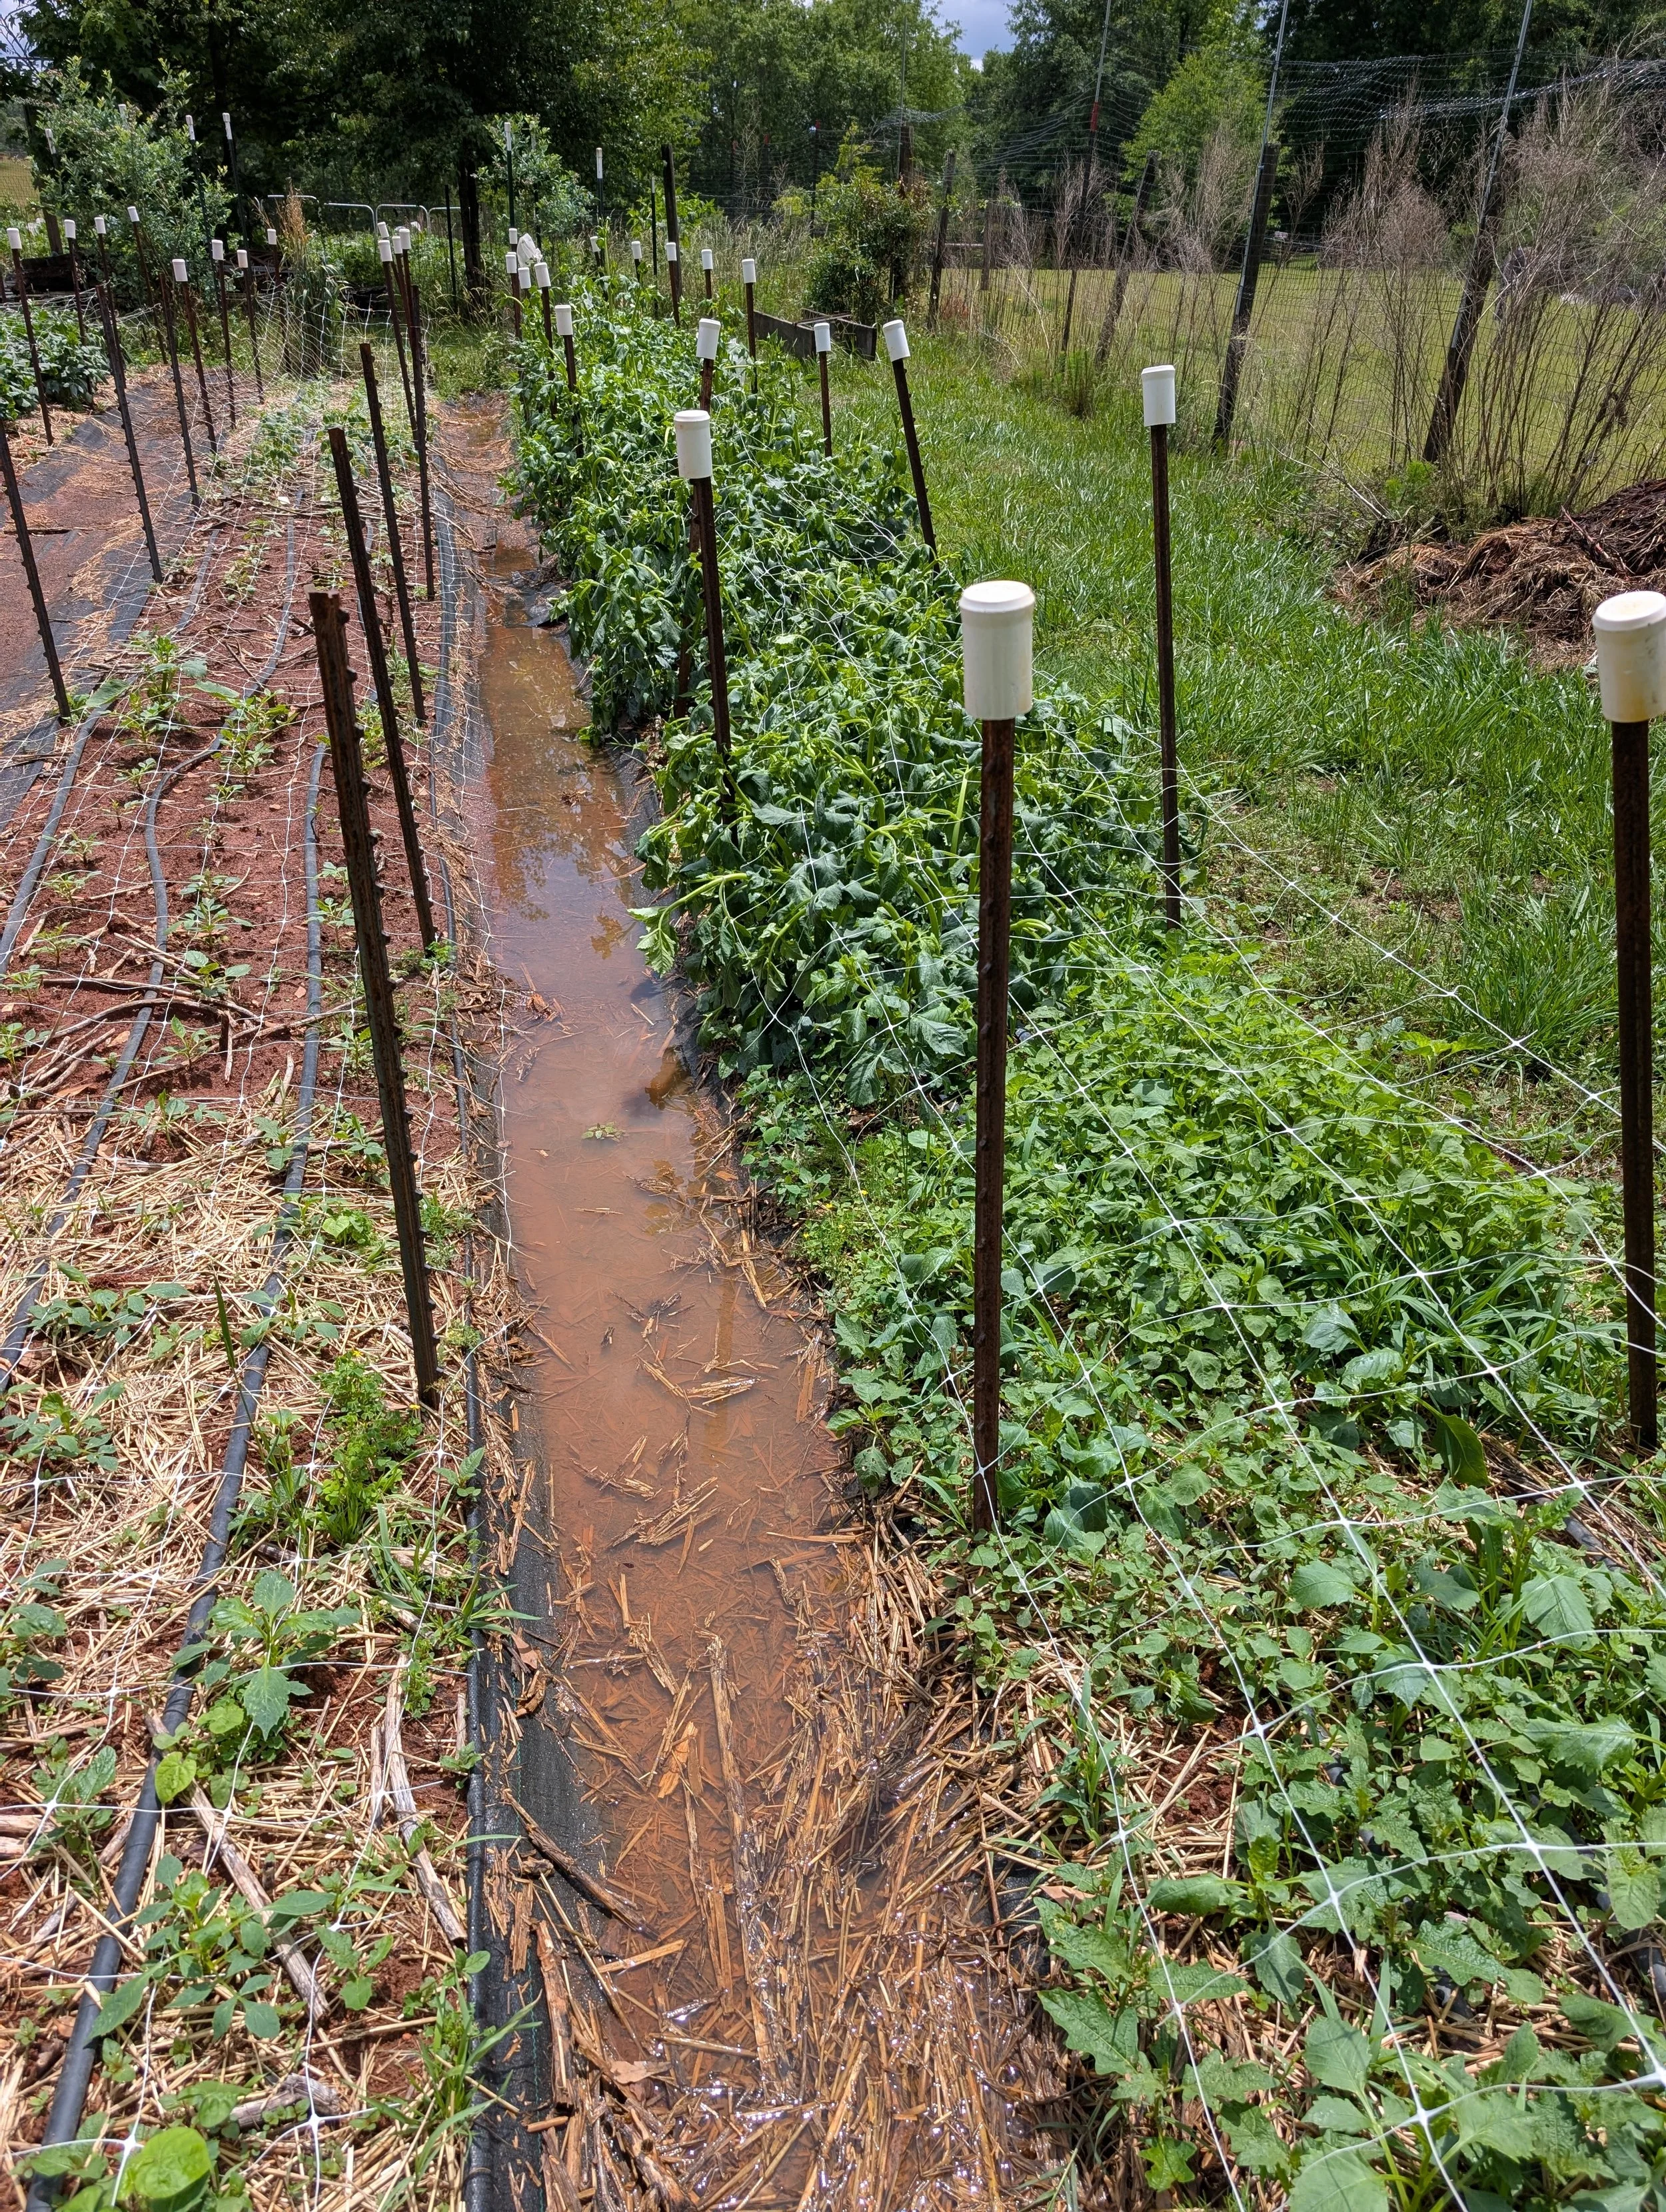
One thing I love about plants is how much they will teach you if you observe them carefully. Midweek after a lot of heavy rain, I went to our offsite plot which has 3 different fields. Two of the fields look fantastic- new dahlia growth after so much rain is beautiful- so clean and bug free! But the third field is suffering a bit. It’s the oldest and has really good soil nutrient wise but not the same set up regarding drainage. So the plants looked like this as soon as the sun came out:

So many of the tops were flopped over. They’ll rebound but I am definitely seeing some drainage improvements are needed in this field. Below you can see where we had standing water. If the water drains out in 24 hours I don’t worry about it. But over all this field is holding too much water around the roots. The beds in this fiels are about at ground level. They don’t have much raise to them.

In the field next door, there are a few spots that hold water in the pathways but the beds are raised up by 6-8” and it’s making a world of difference.
Most likely we will have to redo the other field this fall. Dig everything out and raise the beds up because even those few inches make all the difference.
But despite the drainage issues, the plants are looking so happy. We cut our first stems this week and are looking at a nice flush a week or so from now. How are your dahlias doing this Spring?