


New (To Me) Dahlia Varieties - August 2023
Dahlias have been in bloom for a full month here on our farm in Travelers Rest. I’m already seeing some new varieties that have potential as keepers.
I love dahlias that bloom in August! Why? Because early bloomers have so much potential- you can usually get two flushes off early varieties in our long growing season. So much more beauty potential!
I want to share some of them with you today. Caveat— These are my first impressions. I grow a dahlia for at least 2 years, usually 3 before I choose to add it to my collection.
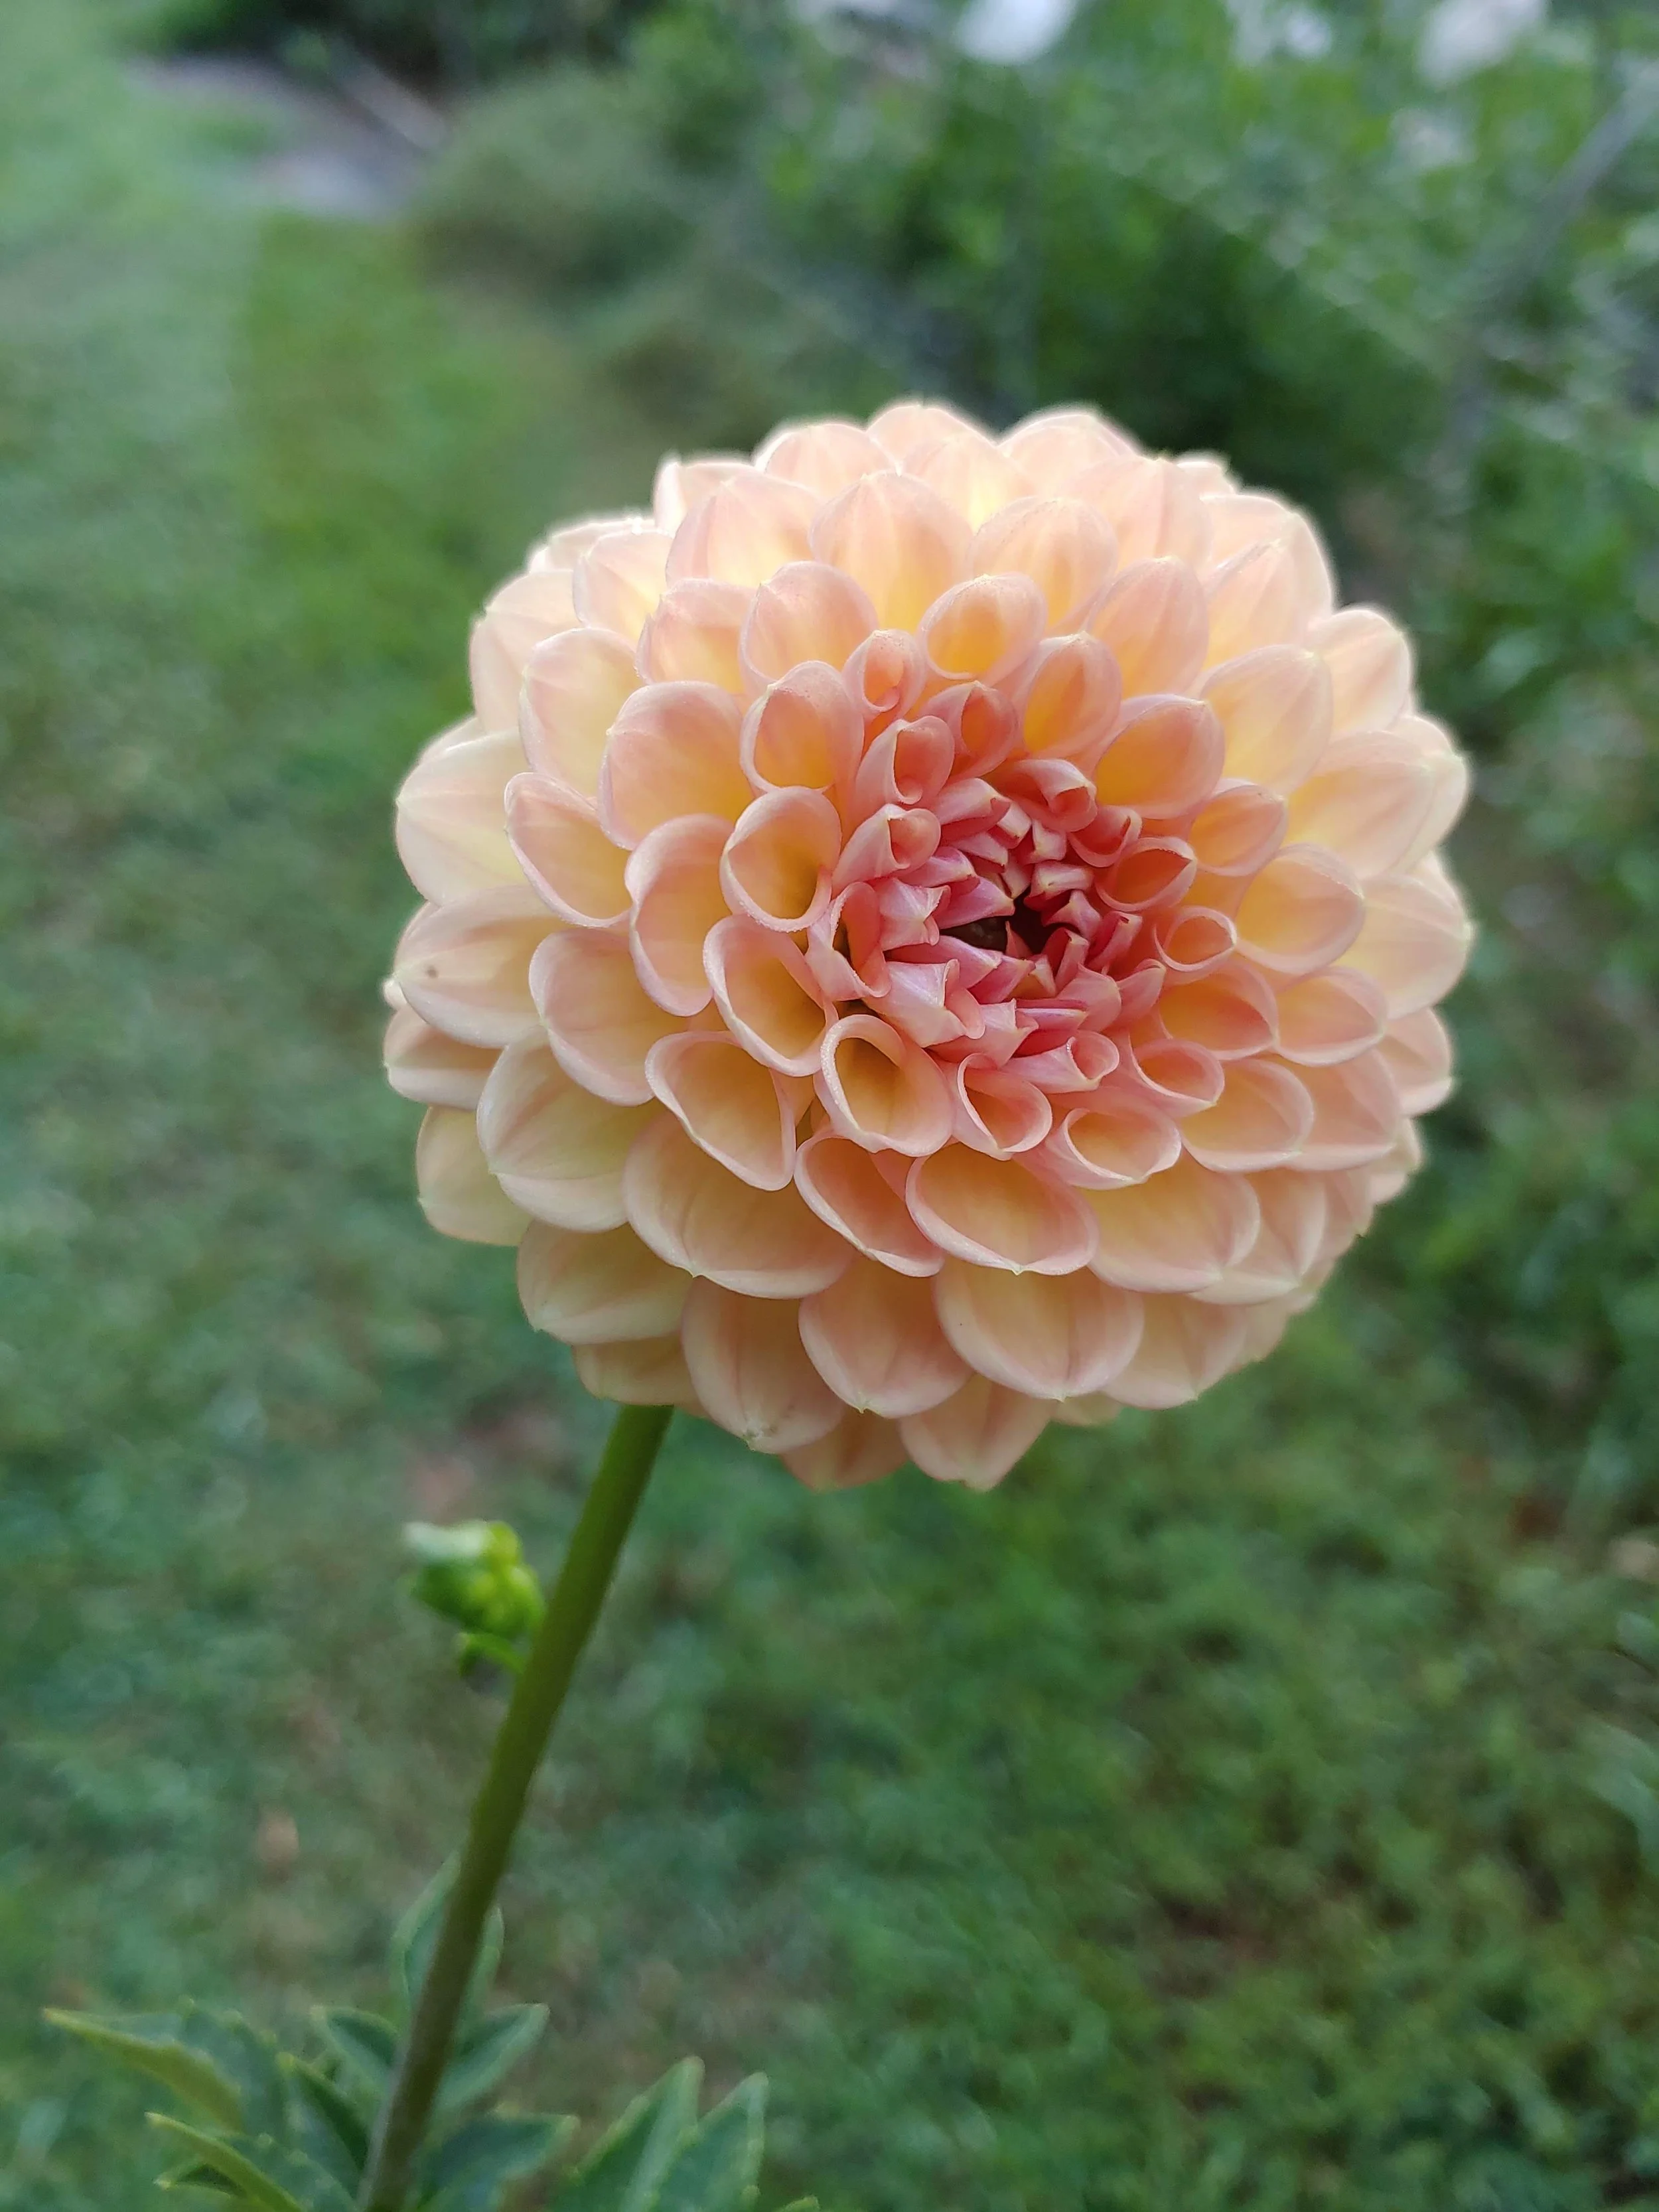
Lark’s Ebbe
Lark’s Ebbe: I don’t think I really have to say much about this one- What a gorgeous color! Perfect size, I mean what’s not to like. Early bloomer, not too tall. So far it’s got a lot going for it.

Yvonne
Yvonne: I grew this one a few years ago but ended up getting rid of it. But from time to time I would think about this dahlia so I decided to bring it back. It’s a great combination dahlia— by that I mean that it’s good for a cut flower but also as a garden dahlia. It’s not super tall so will stand on it’s own with minimal support (or you could plant it admist other things to support it some). Early bloomer and gives lots of blooms. The petals are a bit susceptible to bruising (which was the original reason I cut it) but if you can handle it well— It’s really gorgeous!
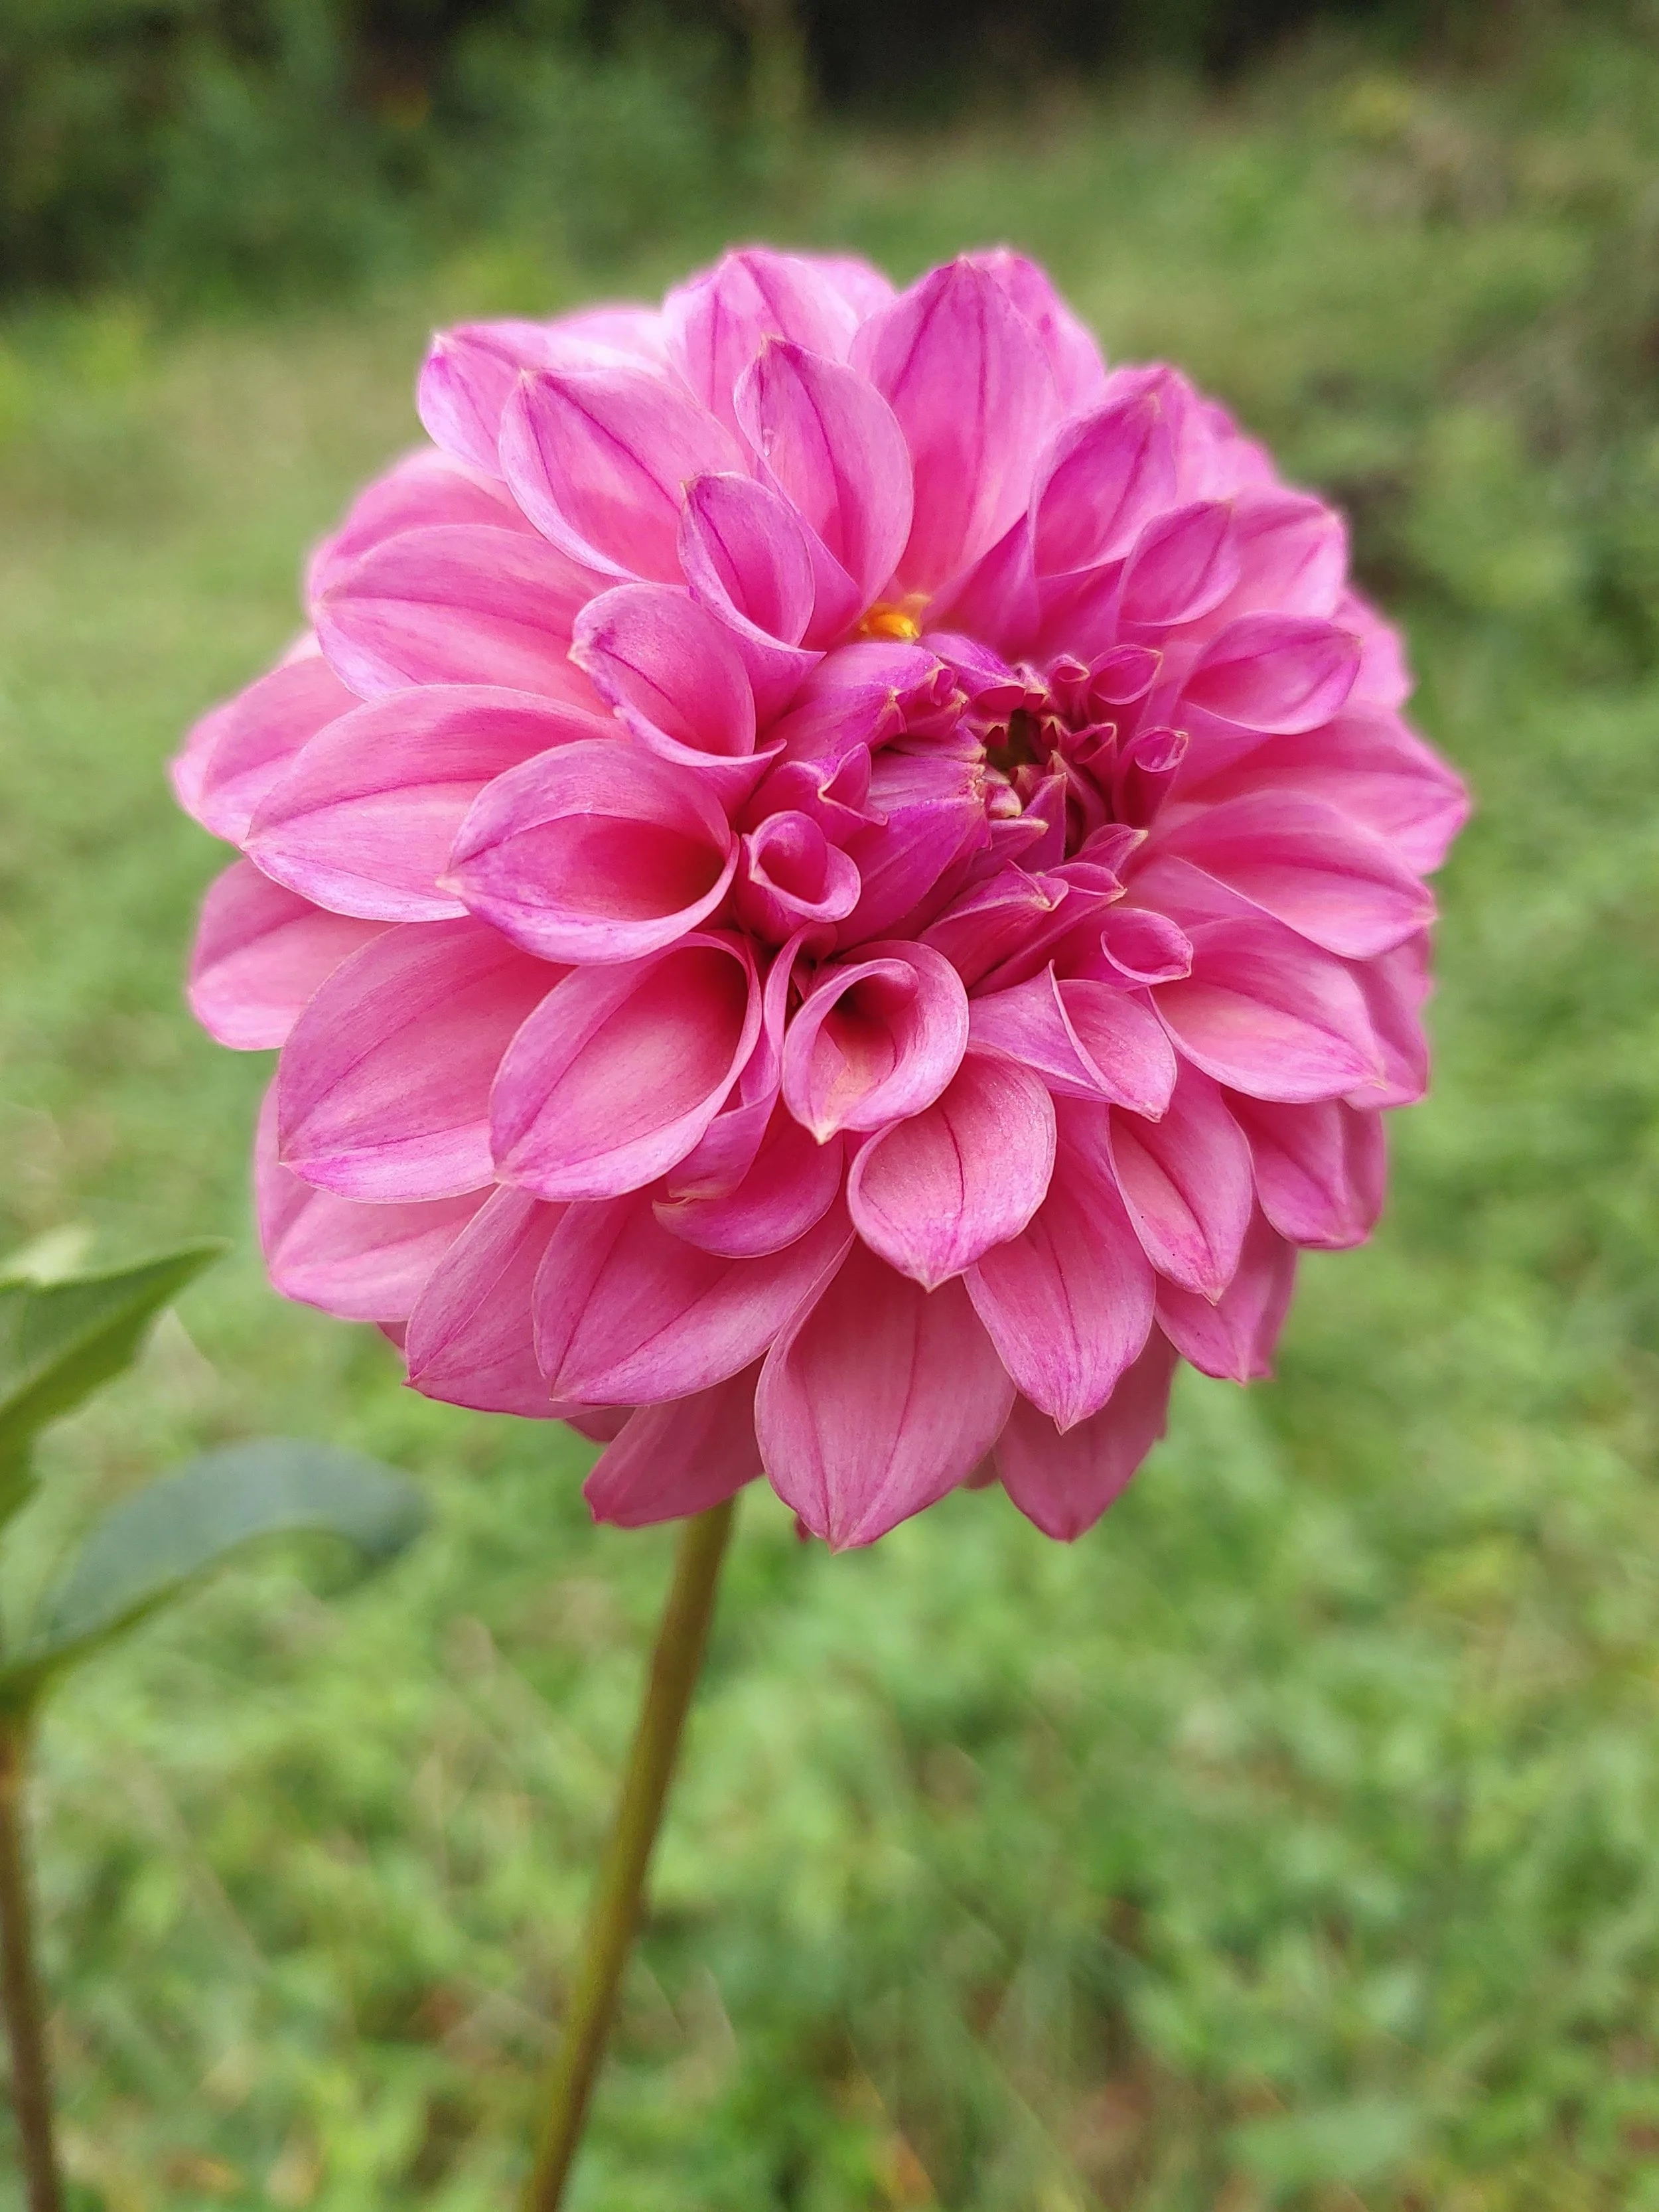
KA’s Keltie Rose
KA’s Keltie Rose: 2nd year growing but in the crapshoot that was the 2022 season, I only got one bloom. This was grown from a cutting so it could be a bit later from a tuber. But the color on this— the photo doesn’t do it justice. It’s a dusty smoky rose color! I’m hoping it will pump out some blooms because I see a lot of potential for this color- I need a prolific bloomer in this tone. It’s a pretty plant too— slightly darker green foliage and the plant blooms above the leaf canopy.

Robinhood
Robinhood: This is another one that I used to grow but lost the tubers back in the days when I didn’t know how to store properly (takes a few years to learn). I love it’s coloring- kinda raspberry with peachy undertones. Early bloomer and threw a flush of several stems at once.

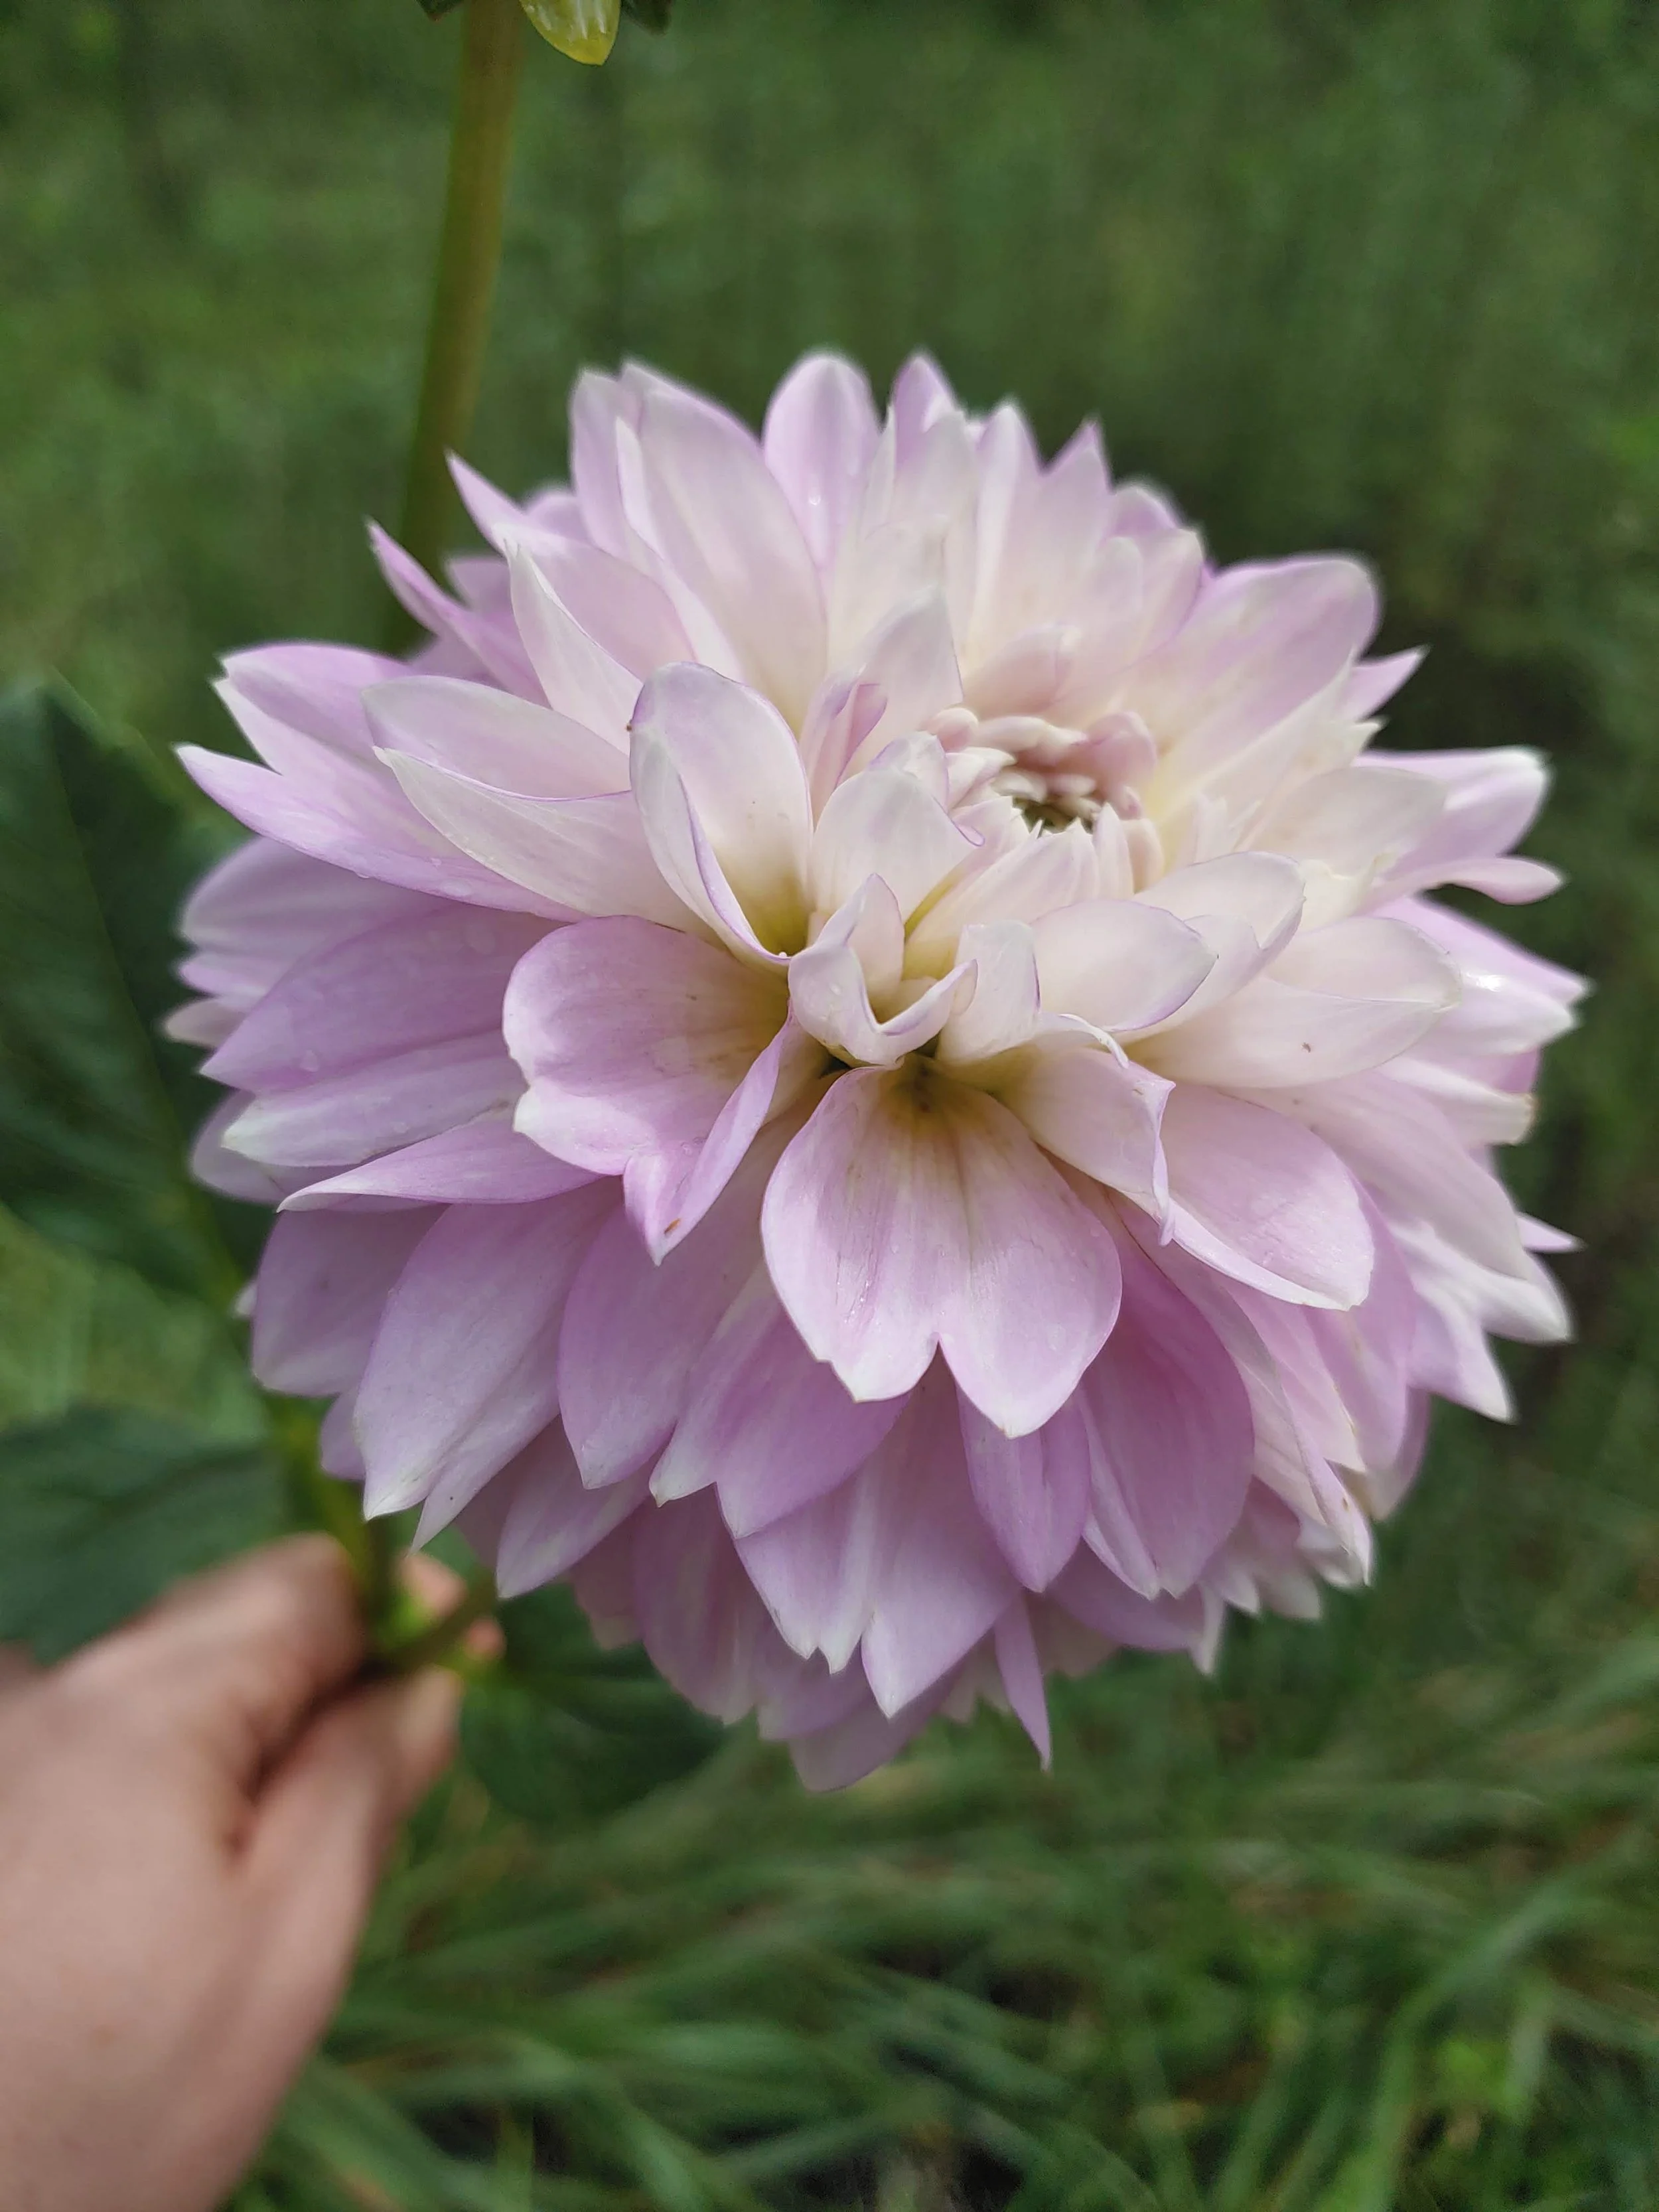
Gerrie Hoek
Gerrie Hoek: I’m loving the color and form of this one. It changes color with temperature too— blushier in heat and pinker in cool. It does have some growth habit issues— does a bit better with some disbudding so we’ll see if I feel like keeping up with that. But the main thing I love about this dahlia is that it makes me smile every time I walk past it. It’s the happiest flower!

All That Jazz
All That Jazz: This one was offered to me as a trade from another grower. I loved it’s coloring in photos I saw. I’ve been eagerly awaiting it to bloom and it finally did this week. The photo doesn’t do it justice - it has a tan/peach reverse with some purple tips and almost a light sangria color to the front. I’m going to have to pull out my nice camera because the phone camera isn’t cutting it!
So just a few I’m excited about. Still need to see if they are good tuber producers, resistant to powdery mildew, prolific and then to see how they do through different growing conditions - which takes a few years!
Late Summer Dahlia Care-- Keep Going!!
It’s August— So it’s hot and it’s either wet or dry depending on where you live. Most likely it’s not an ideal climate for your dahlias right now.
It’s been a mostly wet summer here. We had a hot dry patch in early July (complete opposite of last year’s cool wet beginning to July). It’s easy to want to give up right now. I’ve heard multiple times recently— I’m going to quit growing dahlias if they don’t start looking better soon!
Well I’ve got news for you— how they look and perform— that’s up to you (to a degree). Yes, the weather plays a substantial part. But as a dahlia grower, you have to observe and adapt to whatever the weather is throwing at you!

KA’s Mocha Katie (a new personal favorite)
For example, we’ve had thunderstorms that dump loads of water at least 3 times a week recently- sometimes we’ve even gone a stretch of several days in a row of afternoon rain storms. As I walked my field the other day, I began noticing lighter green leaves on the newer growth. This is a sure sign that the dahlias need feeding. Lots of rain means that nutrients are leaching out. One benefit to clay soil even in rain, it does hold more nutrients than a sandy soil. I spent a lot of time earlier this week feeding my dahlias. And with as much rain as we’ve already had this week, I’ll probably feed again before the week is out. I feel like they are behind nutrient wise and a double feed won’t hurt them this time. I wouldn’t normally feed 2x a week but I think they are really low in nutrients right now.
I’m feeding with Alaska Morbloom which is a 0-10-10. I also added some fish emulsion since we’ve had so much rain. I usually stay away from nitrogen this time of year but I could tell the plants needed it. Just keep the phosophorus and potassium numbers (the last 2 in the 3 number chain) higher than your nitrogren when your dahlias are beginning to produce buds and blooms.
I also applied a fungicide. Thankfully I haven’t seen any powdery mildew yet- although with the current weather conditions, that’s not surprising. Powdery mildew can come on fast as it gets later in the season; it’s definitely time to begin frequent scouting for it. With as much rain as we’ve had, I do know we are likely to get other fungal related diseases so a fungicide regimen this time of year is crucial. I sprayed Cease the other day. But I also alternate with Copper and Milstop too. I’ll move more towards the Copper and Milstop rotation as we get later into the season. Those actively kill fungal spores. The Cease is more of a preventative measure and it’s quickly getting past the prevention stage in the field.

Linda’s Baby Dahlia from the side
I’ve also seen some plants just melt down and rot. But with the amount of rain we’ve had, I’m not surprised. Disappointed yes, but not surprised. It’s only a few plants here and there and with heavy rain and heavy clay soil, it’s to be expected. The loss rate is still nothing like the loss rate of last year during the dry heat wave of a summer we had.
BJ”s Dusty Rose
Dahlias in a hot humid climate definitely aren’t for the faint of heart. They aren’t a plant it and forget it plant. But the good news is— there are lots of ways to adapt and I find I really enjoy a crop like dahlias because after 10+ years of growing them, I still learn tons of new tricks every year!
If you are a new grower, hang in there. The pay off is coming. The weather will begin to cool in a few weeks and the dahlias will begin their big show!
Dahlia Crop Protection: Surround WP
If you follow lots of flower farmers on Instagram, you’ve probably seen it— the chalky white liquid being sprayed all over their plants.
So what is this stuff? It’s call Surround WP. It’s a crop protection spray. It’s made of Kaolin clay which is milled very finely into a powder that’s water soluble. It’s also OMRI listed (this means it’s certified organic).
I use a battery operated backpack sprayer to apply it. Hand held works well too. I have a My 4 sons sprayer- mine has held up well since 2019 and it’s still working great. I love that it holds a charge for forever! Battery operated is worth it if you are spraying more than 2-3 rows.
The mix rate is about 2-3 cups of powder to 1 gallon of water. I mix it to the heavier 3 cup side for my first application of the season. After you have a bit of a base on the plant, you can mix a bit lighter when you reapply. It will stay on through some rain but will eventually need to be re-applied. I do mine around every 2 weeks but that can vary depending on how much rain we have- sometimes it’s more often, sometimes not.

A light first application- I’ve learned to begin at a heavier rate and then spray lighter in subsequent applications.
It looks like you are spraying milk and at first, you will wonder if it’s doing anything. But it has to dry on the plant- that’s when it begins to show some coverage. Nice thing about the Surround is that you can spray it pretty much any time of day as long as it’s not windy. It’s not going to burn like a fertilizer or horticultural oil. You can also mix other things into the spray- such as fish emulsion. I would recommend spraying early morning or evening if you are going to mix other liquids/oils.
I spray it during the first 2 months of a dahlia’s growth cycle. After that, bud development begins and that’s when you want to stop. It never completely washes off - even with a lot of rain. I can always see a little bit of it on the lower leaves up until frost. But you don’t want it on your blooming stems so I stop when I see bud formation.

A heavier application
You can also see the other reason to reapply— the new growth will need covering. It’s easy to measure how fast your dahlias are growing in between sprays.
So what is this spray doing for my dahlias? Several things:
Sun protection - As my friend Daniel at Petal Pickers Flower Farm says— it’s like sunscreen for plants! That’s a pretty accurate description. It’s the plant version of the white sunscreen you see on people’s noses! It reflects light away from the plants and generally keeps them cooler (up to 10-15 degrees cooler). When I grew dahlias in landscape fabric, I would spray the fabric as well as the plants for maximum reflective qualities. I spray for sun protection when I see temps in the high 80’s and higher. I grow in straw mulch now but still use landscape fabric in my pathways so I spray the pathways when it gets really hot.
Powdery mildew protection- PM spores get on your plant leaves and start turning into white powdery disease evilness. Surround prevents the spores from getting to your leaves. It’s a great form of early season PM prevention.
Pest Prevention- It’s not going to keep everything from eating your plants, but it will lower the pest load. It can help deter small animals (deer too) from eating your plants. It has a nasty taste to them. It’s not a fool proof solution but it’ll help. For a more complete list of pests deterred, click here.
One last quick tip— Before your first spray, inspect your field very carefully for any signs of virus. It can be harder to detect under the spray. Also inspect before each spray- check the new growth because that’s where it’s going to be easiest to see virus developing once you have the spray applied. The spray is useful at helping to keep virus loads in your fields down because it’s helping to control pests that spread viruses. Also you can still check for virus even after spraying if you do it very early in the morning. I get a heavy dew most mornings and when the plants are wet, the spray is not chalky so I can easily inspect for virus during this time.
Surround WP has become an important part of our growing plan for dahlias. We always get hot at some point, we have loads of pests and powdery mildew always raises it’s ugly head— So to be able to handle all that with one solution— well what’s not to like!

The Mulch Chronicles- Part 3
We’ve discussed different forms of mulching for commercial or large home scale growing but what about backyard dahlia growers?
Mulch by definition is just a layer of material applied to the surface of the soil. So therefore mulch can be many different things— straw, pine straw, bark, rocks, landscape fabric, grass clippings, shredded leaves, newspaper/cardboard, etc.
They all have pros and cons and we’ll get to those in a bit but first— what are you looking for in a mulch?

Most of the time, we want weed suppression and moisture retention from mulch and if it’s an ornamental garden, we’d like it to look nice too.
Also it’s worth remembering that mulch will decompose (unless it’s an inorganic type -rubber mulch, landscape fabric, etc.) So you will have replenish it - yearly for most types of organic mulch. This is important to note and remember. Mulching is not a do it and then assume you’ll never have to again type of job. Keeping it topped up is one of the best ways to avoid hours on your hands and knees weeding!
Let’s take a look at the most common types of mulch:
1. Pine straw— this one is popular (evidenced by the number of you who emailed me asking about it). Pine straw is a very commonly used mulch - especially in Southern states because we have lots of pines. It’s easy to source, affordable and weed free. Lots of good points but nothing is perfect. Pine straw has the tendency to move around in a heavy rain/wind storm. Also due to it’s nature (skinny long pieces), it’s weed suppressing capabilities aren’t the strongest. It’s slow to decompose - which is a pro and a con. Pro because you may not have to replace as often, con because it’s not adding organic matter to your soil as quickly.
2. Bark- Definitely one of the best looking mulches for landscape situations. Adds nutrients to your soil as it breaks down. It has a reasonable decomposition rate— by that I mean it’s not super slow but not fast either. You’ll lose a small percentage the first year and it’ll increase after that if you don’t top it up. A 4-5” layer of bark mulch will suppress a lot of weeds though! Be careful about using bark mulch that’s been sitting open to the environment for awhile- it can harbor weed seeds. If you are buying by the truckload, cover it or use it up quickly so it doesn’t turn into a weed seed repository. I have found that when using bark mulches with heavy clay soil that it tends to add to the “heavy” factor of clay soil. I recommend adding compost before you lay down your bark mulch. This will keep your soil from becoming too heavy.
3. Rocks- For a permanent planting, these can look great. Probably not ideal for dahlias though. Since there is the potential for having to dig the dahlia, I wouldn’t recommend rocks as a great choice.
4. Grass Clippings- First off you want to make sure your clippings haven’t been treated with anything that could harm your dahlias. Make sure you know what’s on that grass! Also be careful not to apply them too thickly and they can mat and prevent air flow and too much moisture retention around your plants. They are a valuable source of organic matter for your soil though. I would apply clippings in a thin layer and then apply another type of mulch on top.
5. Shredded Leaves— Leaves are the gold standard for adding amazing organic matter to your soil. I was lucky to get a free dumptruck load of aged leaf compost at my farm many years ago. I can still tell where that compost was added because the soil is noticeably better there. Nice thing about leaves is that you should be able to get them for free. You’ll need to think ahead for the next season and collect in Fall. If you have a shredder, even better. Or just run a lawnmower over a pile of leaves. The smaller pieces will break down quicker.
6. Newspaper/Cardboard- I definitely wouldn’t call these stand alone mulches but they are useful tools. If you are dealing with an especially heavy weed load, applying a layer of paper/cardboard will really help to keep the weeds down. Cardboard plus 6” of bark mulch will keep weeds at bay for quite a while. It’s a good tool for an especially weedy area.
There are plenty of types of mulch out there— My thoughts are— use what’s plentiful in your location, easy to acquire, affordable and will keep weeds down and moisture retained!

The Mulch Chronicles- Part 2
Last time we talked about using straw as mulch. Part 2 is all about using cover crops as mulch. I’ve got 2 different scenarios to share with you.
Scenario #1- Raised beds (4x16)- Seeded mid to late November with a mix of crimson clover, greens mix and daikon radish. The greens mix came from my local feed and seed and probably contained mustard, rape seed, etc. I’ve used similar combinations before so knew these would give me good cover for the winter to suppress weeds and add a decent amount of organic matter to the soil.
So that’s where we started. Here’s how it all went- fast forward to mid December and if you pay attention to the weather you know that most of the US was extremely cold around Christmas Day. We got down to around 6 degrees in my field. Unfortunately this killed off most of the cover crop except the crimson clover.
Fast forward to spring and I had a nice crop of crimson clover with it’s deep red bloom - it was beautiful on a breezy day!
Now let me explain one thing about cover crops and why they have always been a bit frustrating to me.
Timing
As you read above, the crop was seeded mid to late November. That’s kinda’ late- we were still at the temps needed to germinate the seed (benefits of living in a warm climate). I can’t seed it any earlier because our dahlia season doesn’t finish until early November and it takes a bit to dig the tubers. This means we don’t get a lot of growth before winter. Most of the growth happens in April. But then the problem arises- I need to plant in May. Most cover crops require at least a month of tarping to decompose. So if I wait until the end of April to get the biomass I need, then tarp for May- I’m not planting until June.
Sometimes this can work out- depends on what varieties are going in there and my current crop goals for the year. This was the process I followed in the 2022 crop year. But I got to mid June and the crop still wasn’t decomposed. So I had to come up with a plan!
I was still using black fabric at the time so we removed the tarp and laid the black fabric on top of the decomposing cover crop. Then we took our hands and just moved the cover crop out of our planting holes. It looked like this:

Then I took an auger bit on my drill and made a hole. A bit time consuming but it was actually very effective. When we removed the fabric at the end of the season, the cover crop was 90% decomposed and the tubers that came from these beds were some of the best ones of our whole dahlia crop.
I was a bit worried about the decomposition and how it would affect the tuber growth but they did just fine.
This year, I’ve modified the process a bit. I’ve eliminated the black fabric from my process. I took a weed eater to the cover crop in mid May and then tarped it for about 3 weeks.

I’m just pulling the cover crop back, drill with my auger bit and planting. I do think I will add a bit of the straw mulch to these beds because there are some inconsistences in the coverage of the cover crop (probably due to losing half of it in December).
This was a very quick and easy process. I’ll probably use it again.
Scenario #2: This field consists of 45’ in ground beds that are 3’ wide and were cover cropped with winter rye. I chose winter rye because I hoped it would break down faster in the Spring. But when it came time to terminate the crop, I took a different route.
The rye made it through the December freeze just fine. (So side note- crimson clover and winter rye are extremely cold hardy cover crops!) It produced a thick stand of biomass. So thick that I decided it would make a great mulch without tarping it. Instead of terminating it by cutting, we “crimped” it.
Crimping is a common practice used in a lot of no-till farming operations but it really requires a bit of equipment (at least on a large scale). Large scale no till farmers have crimper rollers that attach to the front of their tractors that will flatten a cover crop. Well, we don’t have that.
So we did it the old fashioned way- with our feet! We stomped on the crop and used some metal rakes to rein in the rye grass. Here’s how it looked after about an hour (for 6 rows).

You can seed how the rye has just been folded in and laid flat. You want to try to get it going as much in one direction as you can- this is helpful later.
Now here’s where it gets creative…..
I had to figure a way to plant in it because it wasn’t going to spread into nice round holes like the other cover crop. So what did we do- we turned to a little fire power!

First off— proceed with caution if you try this method and it definitely requires two people. One to burn, the other to stand by with a hose! I know it probably looks like we caught the whole row on fire but we actually didn’t require the hose all that much.
You definitely want to use a template of some sort- that helps to control your burn. This is my template from burning holes in fabric. This template is a 9” on center spacing (experimenting with a closer planting on these too!)

Definitely don’t do this on a windy day and preferably a few days after you’ve had a good soaking rain.

The burning helped us break through the mulch layer which was a solid 6-8” thick. We took our hands and spread the mulch apart in the burn holes, used the auger to break up the soil and planted our tubers. They are already starting to sprout. This cover crop is thick enough that I don’t think it will require any extra straw mulch.

So pros and cons of the 2 scenarios. #2 is more time consuming- it took about 1 hr, 45 min to burn and plant a 45’ row containing 171 tubers with 2 people. However, the mulch is very thick and retains a lot of moisture in the soil (which is good because this is an auxiliary plot where I don’t have dripline irrigation on the dahlias. I can use overhead or hand watering if needed).
#1 is faster but requires weed eating which I don’t really like. I enjoyed the foot crimping process much more than weed eating. Also the crimping doesn’t require you to wait to plant— no decomposition time.
Definite pros and cons to each method and I really think that only time will tell. I’ll report back after a few months have passed with how each scenario is progressing.
Next time— mulch methods for the home or small scale grower.